Technical SEO Fixes You Can Do Without a Developer
Fix common technical SEO issues yourself — meta tags, broken links, page speed, indexing errors, and structured data — using free tools and no coding required.
# Technical SEO Fixes You Can Do Without a Developer
Most small business owners hear "technical SEO" and assume they need to hire someone. The term sounds like it belongs to engineers and consultants who charge by the hour. But here's the truth: a large share of the technical issues hurting your rankings right now can be fixed by you, today, with free tools and no coding whatsoever.
You don't need to understand server configurations, rewrite rules, or JavaScript rendering. The fixes in this guide use tools you already have access to — your CMS dashboard, Google Search Console, and a handful of free browser-based utilities. Each section tells you what the problem is, why it's costing you traffic, and exactly how to fix it, step by step, in plain English.
This guide covers the seven most common technical SEO problems and shows you exactly how to fix each one.

What "Technical SEO" Actually Means
Technical SEO is everything that helps search engines find, crawl, and understand your website. It's not about writing better blog posts or choosing keywords. It's the infrastructure behind your site that determines whether Google can even see your pages.
Think of it this way: your content is what you're saying, and technical SEO is whether the microphone is on. When that infrastructure is broken, your content doesn't matter. Google can't rank what it can't crawl.
Technical SEO covers areas like:
- Crawlability — Can Google's bots access and follow links on your site?
- Indexability — Is Google allowed to add your pages to its search index?
- Site speed — Do your pages load fast enough to meet Google's performance thresholds?
- Structured data — Does your site communicate its content in a machine-readable format?
- URL structure — Are your page addresses clean, consistent, and descriptive?
As Google's own documentation on creating helpful content explains, a site needs to be both useful to humans and technically accessible to search engines. The fixes below tackle the technical side — and every one is something you can handle yourself.
Fix 1: Write Real Meta Titles and Descriptions
What it is: Every page has a title tag and meta description — the headline and summary that appear in Google search results. If you haven't written them yourself, your CMS probably auto-generated something bland or truncated.
Why it matters: Your title tag is one of the strongest on-page ranking signals. Google uses it to understand what the page is about and to display the clickable headline in search results. Your meta description doesn't directly affect rankings, but it determines whether someone clicks your result or skips it. A well-written description acts as ad copy for your page — it's the pitch you make to every searcher who sees your listing.
Pages with generic titles like "Home" or "Services" are competing with a handicap. Pages with no meta description leave Google to pull random text from the body, which almost never represents your page well.
How to fix it:
- Log into your CMS (WordPress, Squarespace, Wix, or Shopify all support this).
- Open your SEO settings. On WordPress, that's Yoast SEO or Rank Math. On Squarespace and Wix, it's built into the page settings. On Shopify, it's at the bottom of each page or product editor under "Search engine listing preview."
- For each important page, write:
- A title tag under 60 characters that includes your primary keyword and business name.
- A meta description under 155 characters that tells the searcher what they'll find and gives them a reason to click.
Example for a plumbing business:
- Before: "Home — My Company LLC"
- After: "Affordable Plumbing Repair in Austin, TX | Smith Plumbing"
- Before: (no description — Google pulls random text from the page)
- After: "Same-day plumbing repair for Austin homeowners. Licensed, insured, no call-out fee. Book online or call now."
Example for a bakery:
- Before: "Products"
- After: "Custom Cakes & Pastries in Portland | Rose City Bakery"
- Before: (auto-generated from page content)
- After: "Order custom birthday cakes, wedding cakes, and fresh pastries. Local Portland bakery with same-week delivery available."
Which pages to prioritize first:
- Your homepage — it's your most-visited page and carries the most SEO weight.
- Your main service or product pages — these are the pages people search for.
- Your contact and about pages — surprisingly often searched for by name.
- Location-specific pages — if you serve multiple areas, each page needs a unique title.
Quick check: Homepage has a unique, keyword-rich title. Every service page has its own title and description. Nothing uses the CMS default. No two pages share the same title tag.
You can check your current meta tags instantly with a free site audit — it flags every page with missing or duplicate titles.
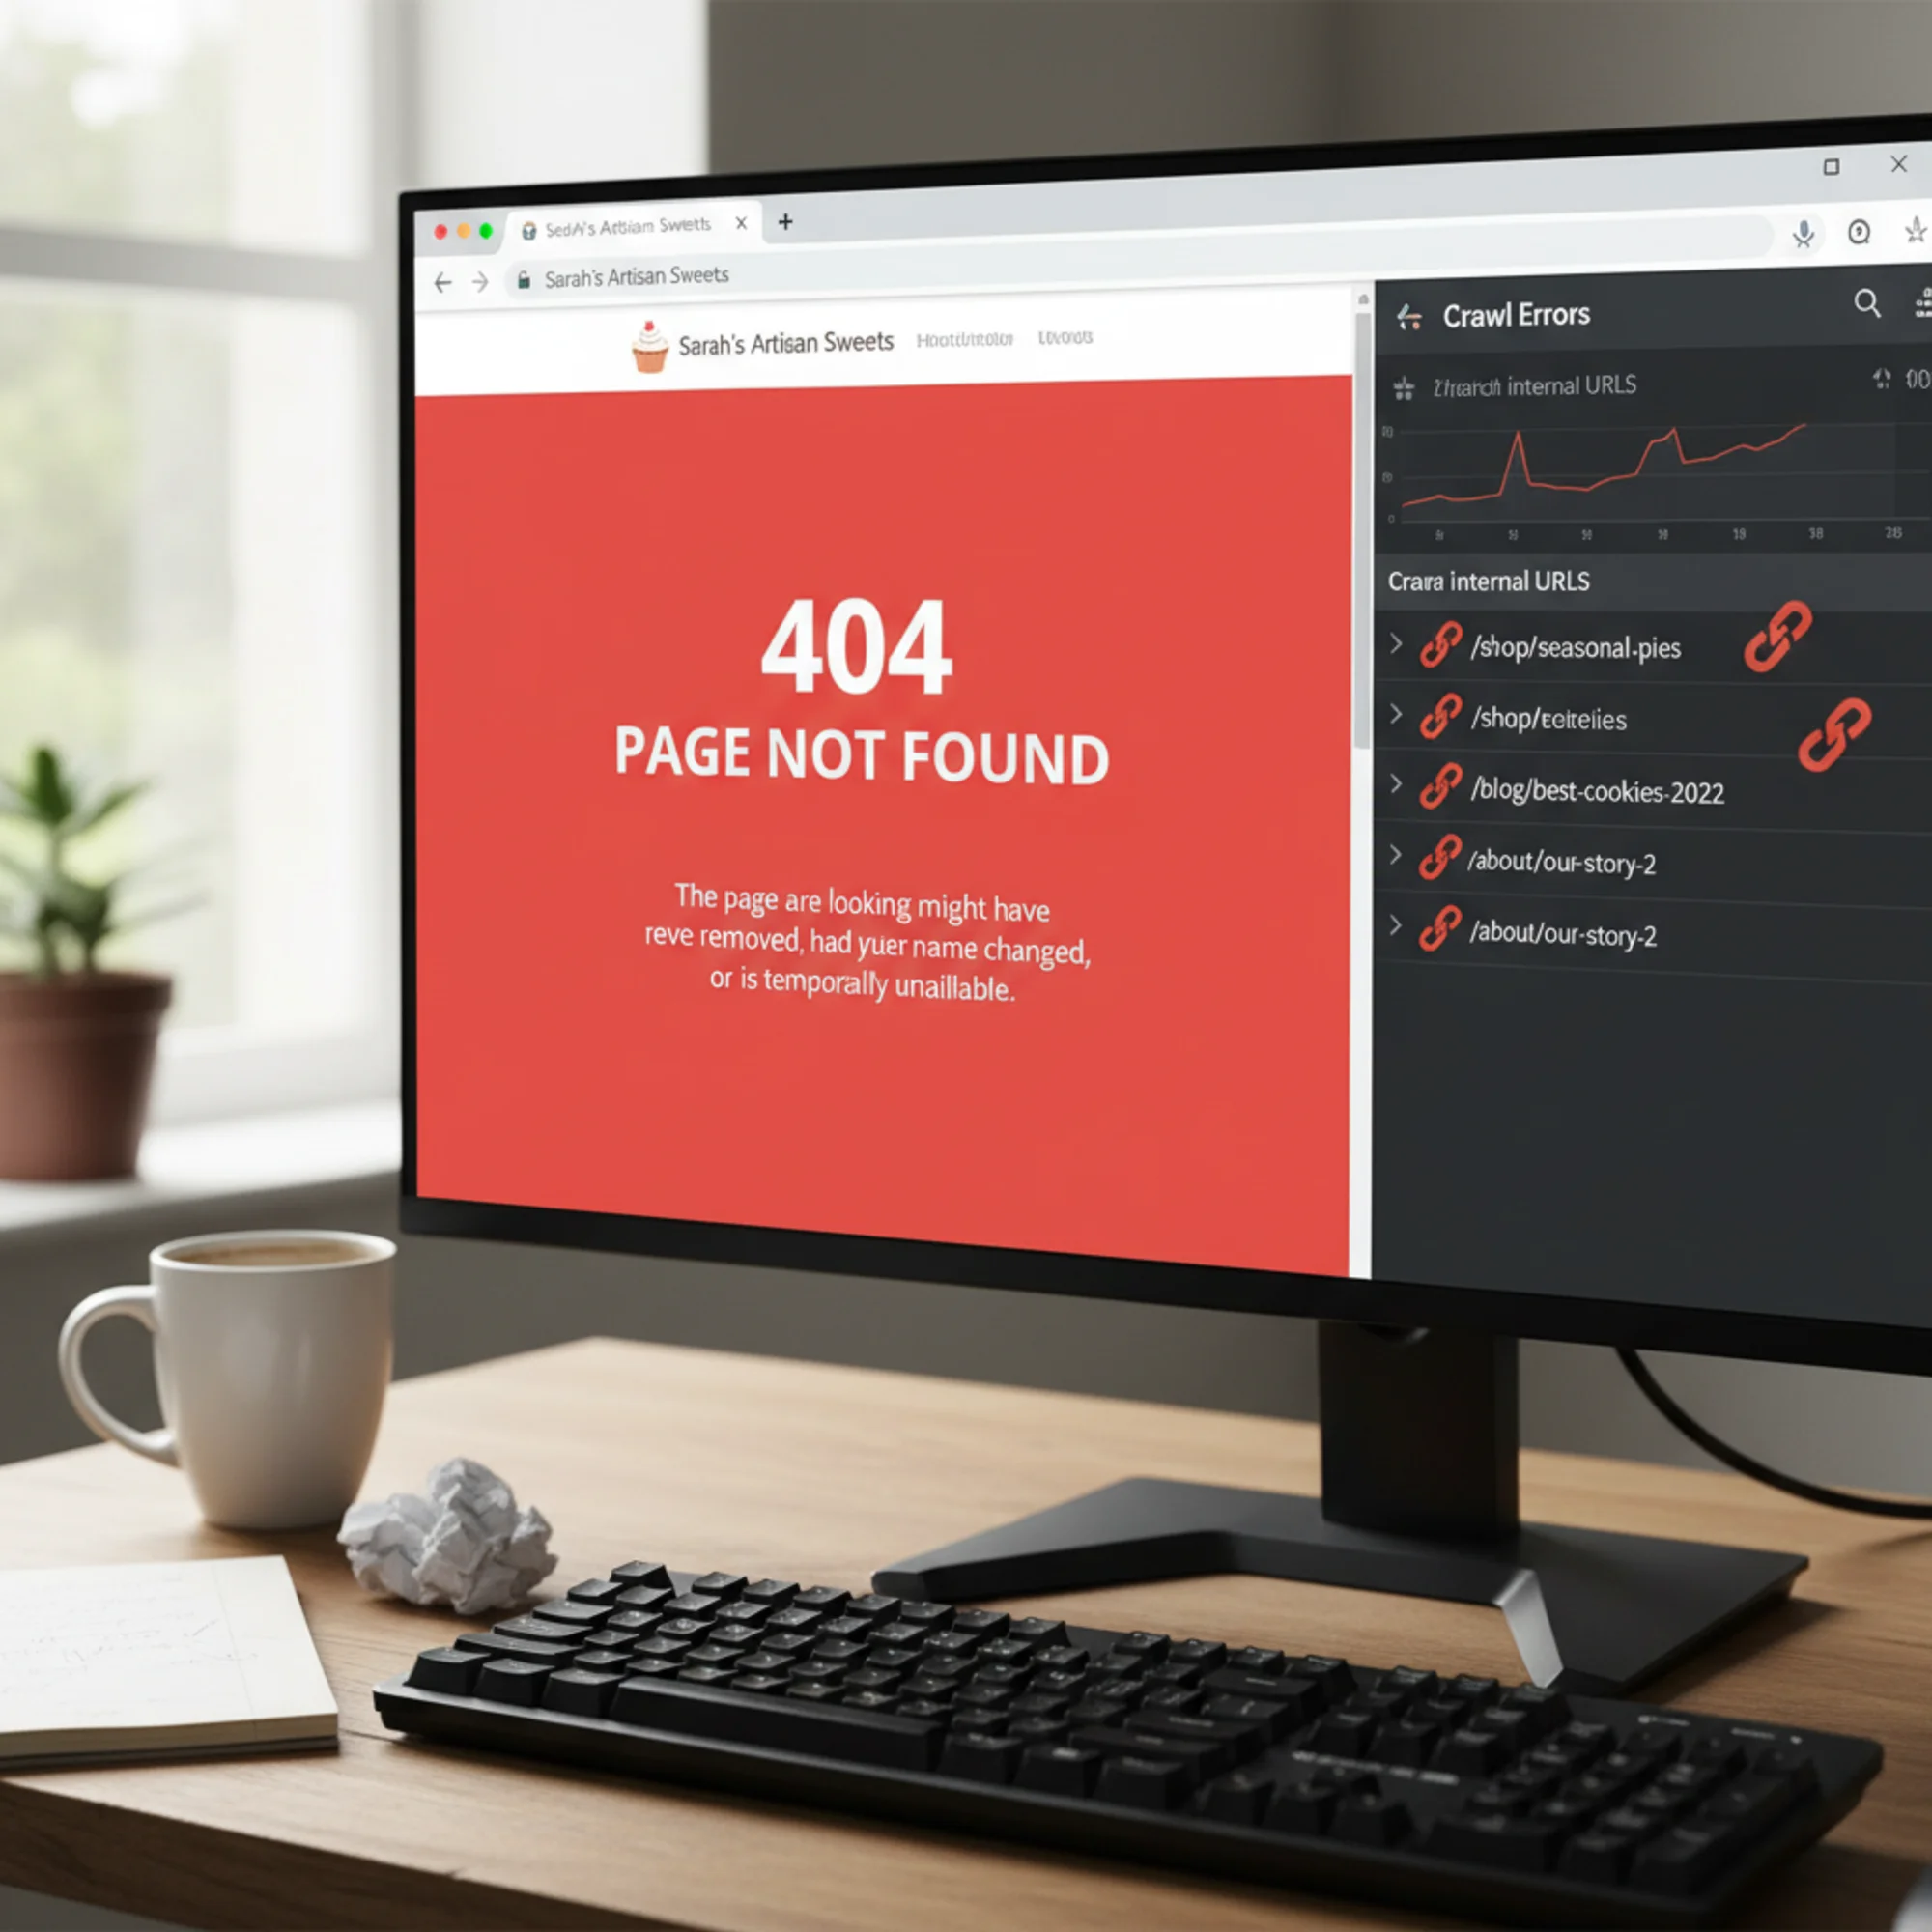
Fix 2: Find and Fix Broken Links
What it is: Broken links are hyperlinks that point to pages that no longer exist. When someone — or Google — clicks them, they get a 404 error instead of the content they expected.
Why it matters: Broken links waste crawl budget, frustrate visitors, and signal to search engines that your site isn't well maintained. Every broken link is a dead end — for a potential customer who clicks it, the experience is confusing and unprofessional. For Google's crawler, it's wasted effort that could have been spent discovering your actual content.
Internal broken links are especially damaging because they interrupt the flow of "link equity" — the ranking power that passes from page to page through internal links. An important service page that's only reachable through a broken link is effectively invisible.
How to fix it:
- Find them. Use Google Search Console's "Pages" report or run a broken link check to get a full list. You can also use free tools like Screaming Frog (free for up to 500 URLs) or the Check My Links browser extension for quick page-level checks.
- For each broken link, decide:
- If the page moved, create a 301 redirect to the new URL. Most platforms have a redirect manager (WordPress: Redirection plugin; Squarespace: URL Mappings; Shopify: URL Redirects).
- If the page is permanently gone and there's no replacement, update or remove the links pointing to it.
- If the link pointed to an external site that's dead, find a replacement resource or remove the link entirely.
WordPress redirect example: Your "Services" page links to /services/window-cleaning, but you renamed that page to /services/exterior-cleaning six months ago.
- Go to Tools → Redirection (with the Redirection plugin).
- Enter
/services/window-cleaningas the source URL. - Enter
/services/exterior-cleaningas the target URL. - Click "Add Redirect."
Every old link, bookmark, and Google index entry for the old URL now lands on the correct page.
Common causes of broken links to watch for:
- Renaming or deleting pages without setting up redirects
- Changing your URL structure (e.g., switching permalink format in WordPress)
- Linking to external resources that have moved or shut down
- Typos in manually entered URLs
- Migrating from one platform to another (Wix to WordPress, for example) without mapping old URLs to new ones
Pro tip: Make it a habit to set up a redirect every time you rename or delete a page. Prevention is always easier than cleanup.
Fix 3: Submit and Clean Up Your Sitemap
What it is: A sitemap is an XML file listing every page you want Google to index — essentially a table of contents for search engines. It tells Google "here are all the pages that matter on my site."
Why it matters: Without a sitemap, Google discovers pages only by following links. If a page is buried deep in your navigation or poorly linked from other content, it may never get crawled or indexed. A sitemap ensures Google knows about every page you consider important.
How to fix it:
- Check if you have one. Visit
yoursite.com/sitemap.xmlin your browser. Most CMS platforms generate one automatically. WordPress with Yoast or Rank Math creates one at/sitemap_index.xml. Squarespace uses/sitemap.xml. Shopify generates one automatically. - Submit it to Google Search Console. Go to the "Sitemaps" section in the left menu, paste your sitemap URL, and click Submit. Google will confirm it's been received and start processing it.
- Review what's in it. Open your sitemap in a browser and look at the URLs listed. Every URL you see should be a page you actually want people to find in Google.
- Remove pages that shouldn't be there:
- Thank-you or order confirmation pages
- Thin tag and category archive pages with little unique content
- Test pages or accidentally published drafts
- Any page you've set to "noindex"
- Login pages, admin pages, or internal tools
- Duplicate pages (HTTP and HTTPS versions, www and non-www versions)
A sitemap that includes pages you don't want ranked sends Google mixed signals. If you're telling Google "index this page" via the sitemap but "don't index this page" via a noindex tag, you're creating unnecessary confusion. Keep it clean and consistent.
How to exclude pages from your sitemap:
- WordPress (Yoast): Edit the page, scroll to the Yoast panel, click the Advanced tab, and set "Allow search engines to show this page?" to No. Yoast automatically removes noindexed pages from the sitemap.
- Squarespace: In page settings, uncheck "Enable page" in the SEO tab.
- Shopify: You'll need to edit the theme's sitemap template or use an app — Shopify's default sitemap includes all published pages.
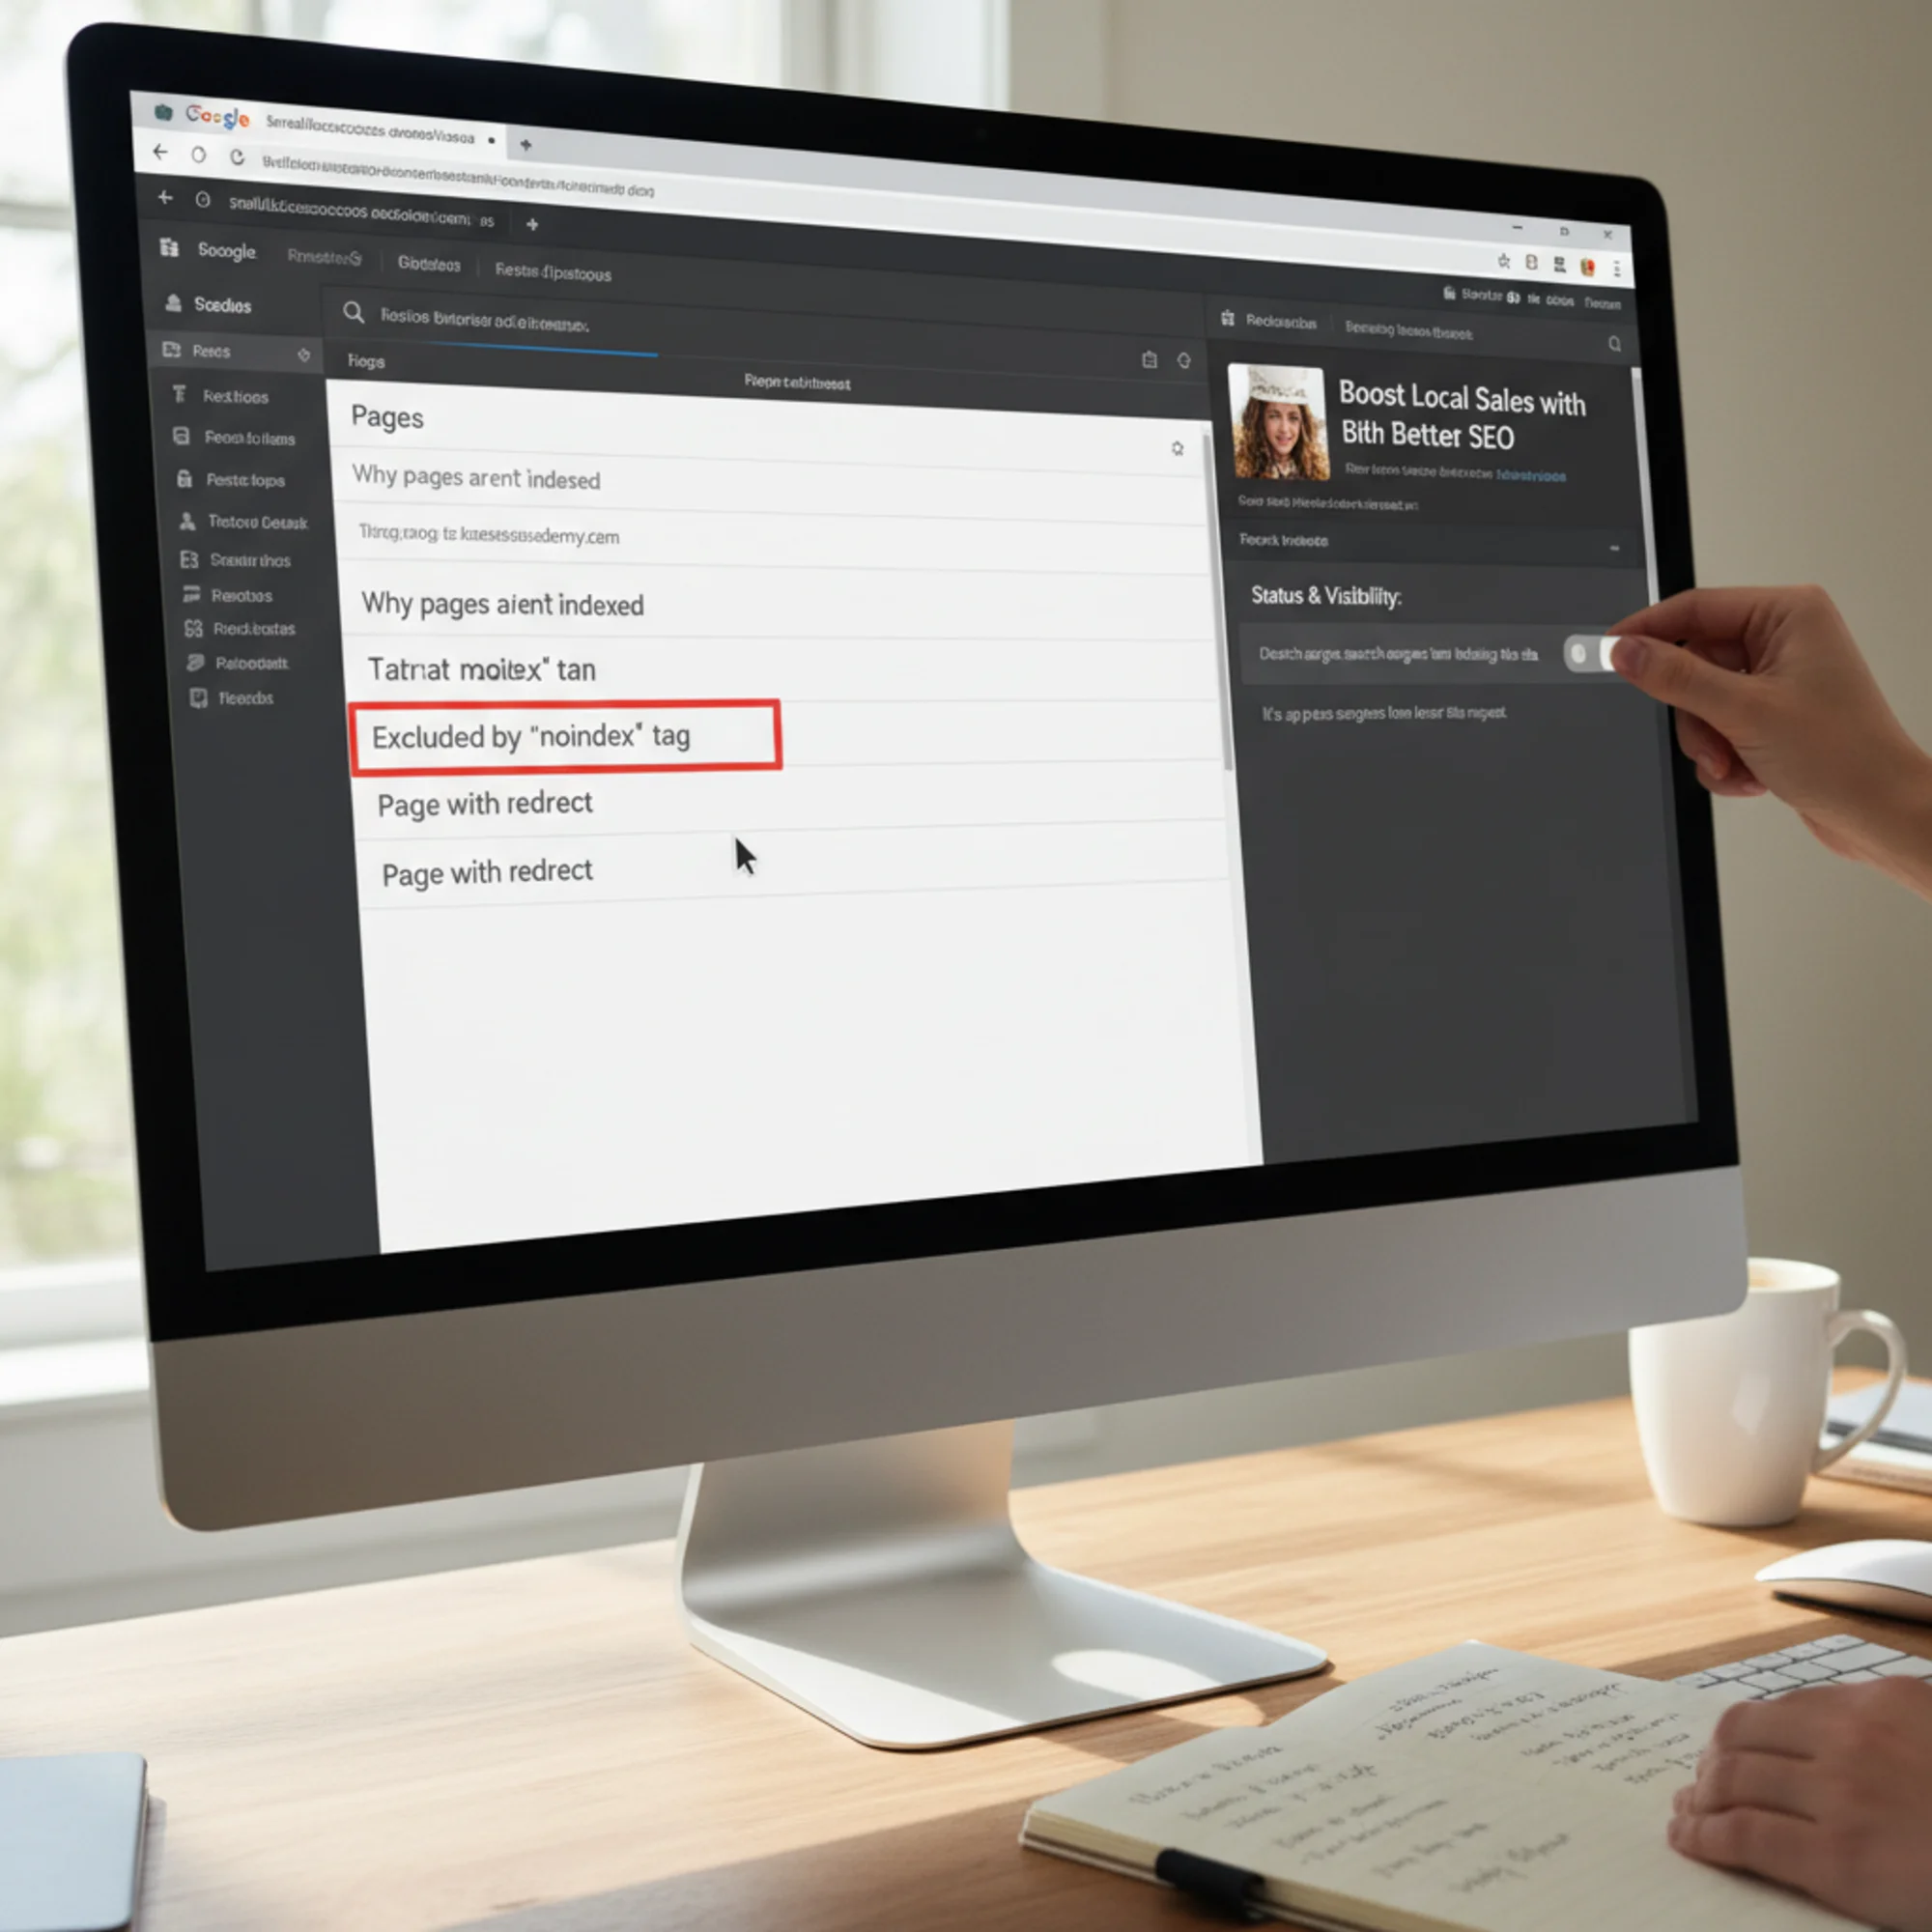
Fix 4: Make Sure Google Can Actually Index Your Pages
What it is: Pages sometimes get accidentally blocked from Google — a leftover "noindex" tag from development, a misconfigured robots.txt file, or a page that requires login to view.
Why it matters: If Google is told not to index a page, it won't appear in search results. Full stop. The best content in the world is invisible if it's blocked. This is one of the most common and most costly technical SEO mistakes because it's completely silent — your site looks fine to you, but Google can't see it.
How to fix it:
- Check Google Search Console. In the "Pages" report (under "Indexing"), look for pages listed under "Not indexed" with reasons like "Blocked by robots.txt," "Noindex detected," or "Crawled — currently not indexed."
- Check your robots.txt. Visit
yoursite.com/robots.txt. Make sure it doesn't containDisallow: /(which blocks everything) or rules blocking important sections like/services/or/blog/. A healthy robots.txt for most small business sites is very simple — it should allow everything except admin areas. - Check individual pages. In your CMS SEO settings, confirm that important pages are set to "Index," not "Noindex." In WordPress with Yoast, this is under the "Advanced" tab of each page's SEO settings. In Rank Math, look for the "Robots Meta" dropdown.
- Check for accidental meta tags in your theme. Some WordPress themes add their own noindex tags, particularly on archive pages. View the page source (right-click → View Page Source) and search for "noindex" to confirm.
A scenario that happens constantly: A web designer builds your site on a staging domain and sets everything to "noindex" so Google doesn't crawl the unfinished site. The site launches on your real domain, but nobody removes the noindex tags. Months later, the business owner wonders why organic traffic is zero. The fix takes 30 seconds — but the cost of not catching it is months of invisible pages and lost business.
Another common scenario: A business owner checks the wrong box in their SEO plugin settings. In Yoast, there's a global setting under Search Appearance → Content Types that can set all pages or all posts to noindex in one click. One accidental toggle can deindex your entire blog.
How to verify a page is indexed: Type site:yoursite.com/page-url into Google. If the page shows up, it's indexed. If nothing appears, it's either blocked, too new to be crawled yet, or has a quality issue that prevented indexing.
Fix 5: Improve Your Page Speed
What it is: Page speed is how fast your site loads for visitors. Google uses Core Web Vitals — a specific set of performance metrics — as a ranking factor. The three metrics that matter most are:
- Largest Contentful Paint (LCP): How long until the main content is visible. Target: under 2.5 seconds.
- Interaction to Next Paint (INP): How fast the page responds when someone clicks or taps. Target: under 200 milliseconds.
- Cumulative Layout Shift (CLS): How much the page layout jumps around as it loads. Target: under 0.1.
Why it matters: Slow sites lose visitors and rank lower. Research consistently shows that visitors abandon pages that take more than three seconds to load. A slow site directly costs you customers before they even see what you offer. Google's page experience signals mean that, all else being equal, a faster site will outrank a slower one.
How to fix it:
Start with images — they're almost always the biggest problem. A single uncompressed phone photo can be 4–8 MB. Your entire homepage should ideally be under 3 MB total. Images alone often account for 60–80% of a page's total weight.
- Compress images before uploading. Use free tools like Squoosh (browser-based, no installation needed) or TinyPNG. Aim for under 200 KB per image. Most photos compress to a fraction of their original size with no visible quality loss.
- Use the right format. JPEG for photographs, PNG only when you need transparency (like logos with no background), WebP if your CMS supports it (WordPress does with most modern themes). WebP files are typically 25–35% smaller than equivalent JPEGs.
- Resize to display size. If an image shows at 800px wide on your page, don't upload a 4000px original. Resize it to 1600px (2x for retina displays) before uploading. Your phone's camera produces images at 4000–8000px wide — that's dramatically more than any website needs.
- Add width and height attributes. This prevents layout shift (CLS) by reserving space for images before they load. Most CMS platforms handle this automatically, but check your theme if you're seeing layout jump issues.
Other quick wins:
- Remove unused plugins. WordPress sites often accumulate 15–30 plugins over time, many no longer needed. Each one adds CSS and JavaScript that loads on every page visit. Audit your plugins list and deactivate anything you're not actively using.
- Enable caching. Caching stores a pre-built copy of your pages so the server doesn't rebuild them for every visitor. Most hosts offer one-click caching. On WordPress, WP Super Cache or LiteSpeed Cache handles it. On Squarespace and Shopify, caching is built in.
- Add a CDN. A Content Delivery Network serves your site from locations around the world, so visitors get content from a server near them. Cloudflare's free tier speeds up any site with minimal setup — you just change your domain's nameservers.
- Minimize render-blocking resources. If your theme loads large CSS and JavaScript files in the page header, they block the page from displaying until they're fully downloaded. Plugins like Autoptimize (WordPress) can defer non-critical scripts.
- Choose faster hosting. If you're on shared hosting that costs $3/month, your server response time is probably slow. Upgrading to managed WordPress hosting (like SiteGround, Cloudways, or Kinsta) can cut load times significantly.
How to test your speed: Run your URL through Google PageSpeed Insights. It gives you a score out of 100 and specific recommendations. Focus on the Core Web Vitals section — these are the metrics Google actually uses for ranking. Don't obsess over the overall score; focus on passing the three Core Web Vitals thresholds.
Check your current performance with a free page speed analysis for recommendations specific to your site.
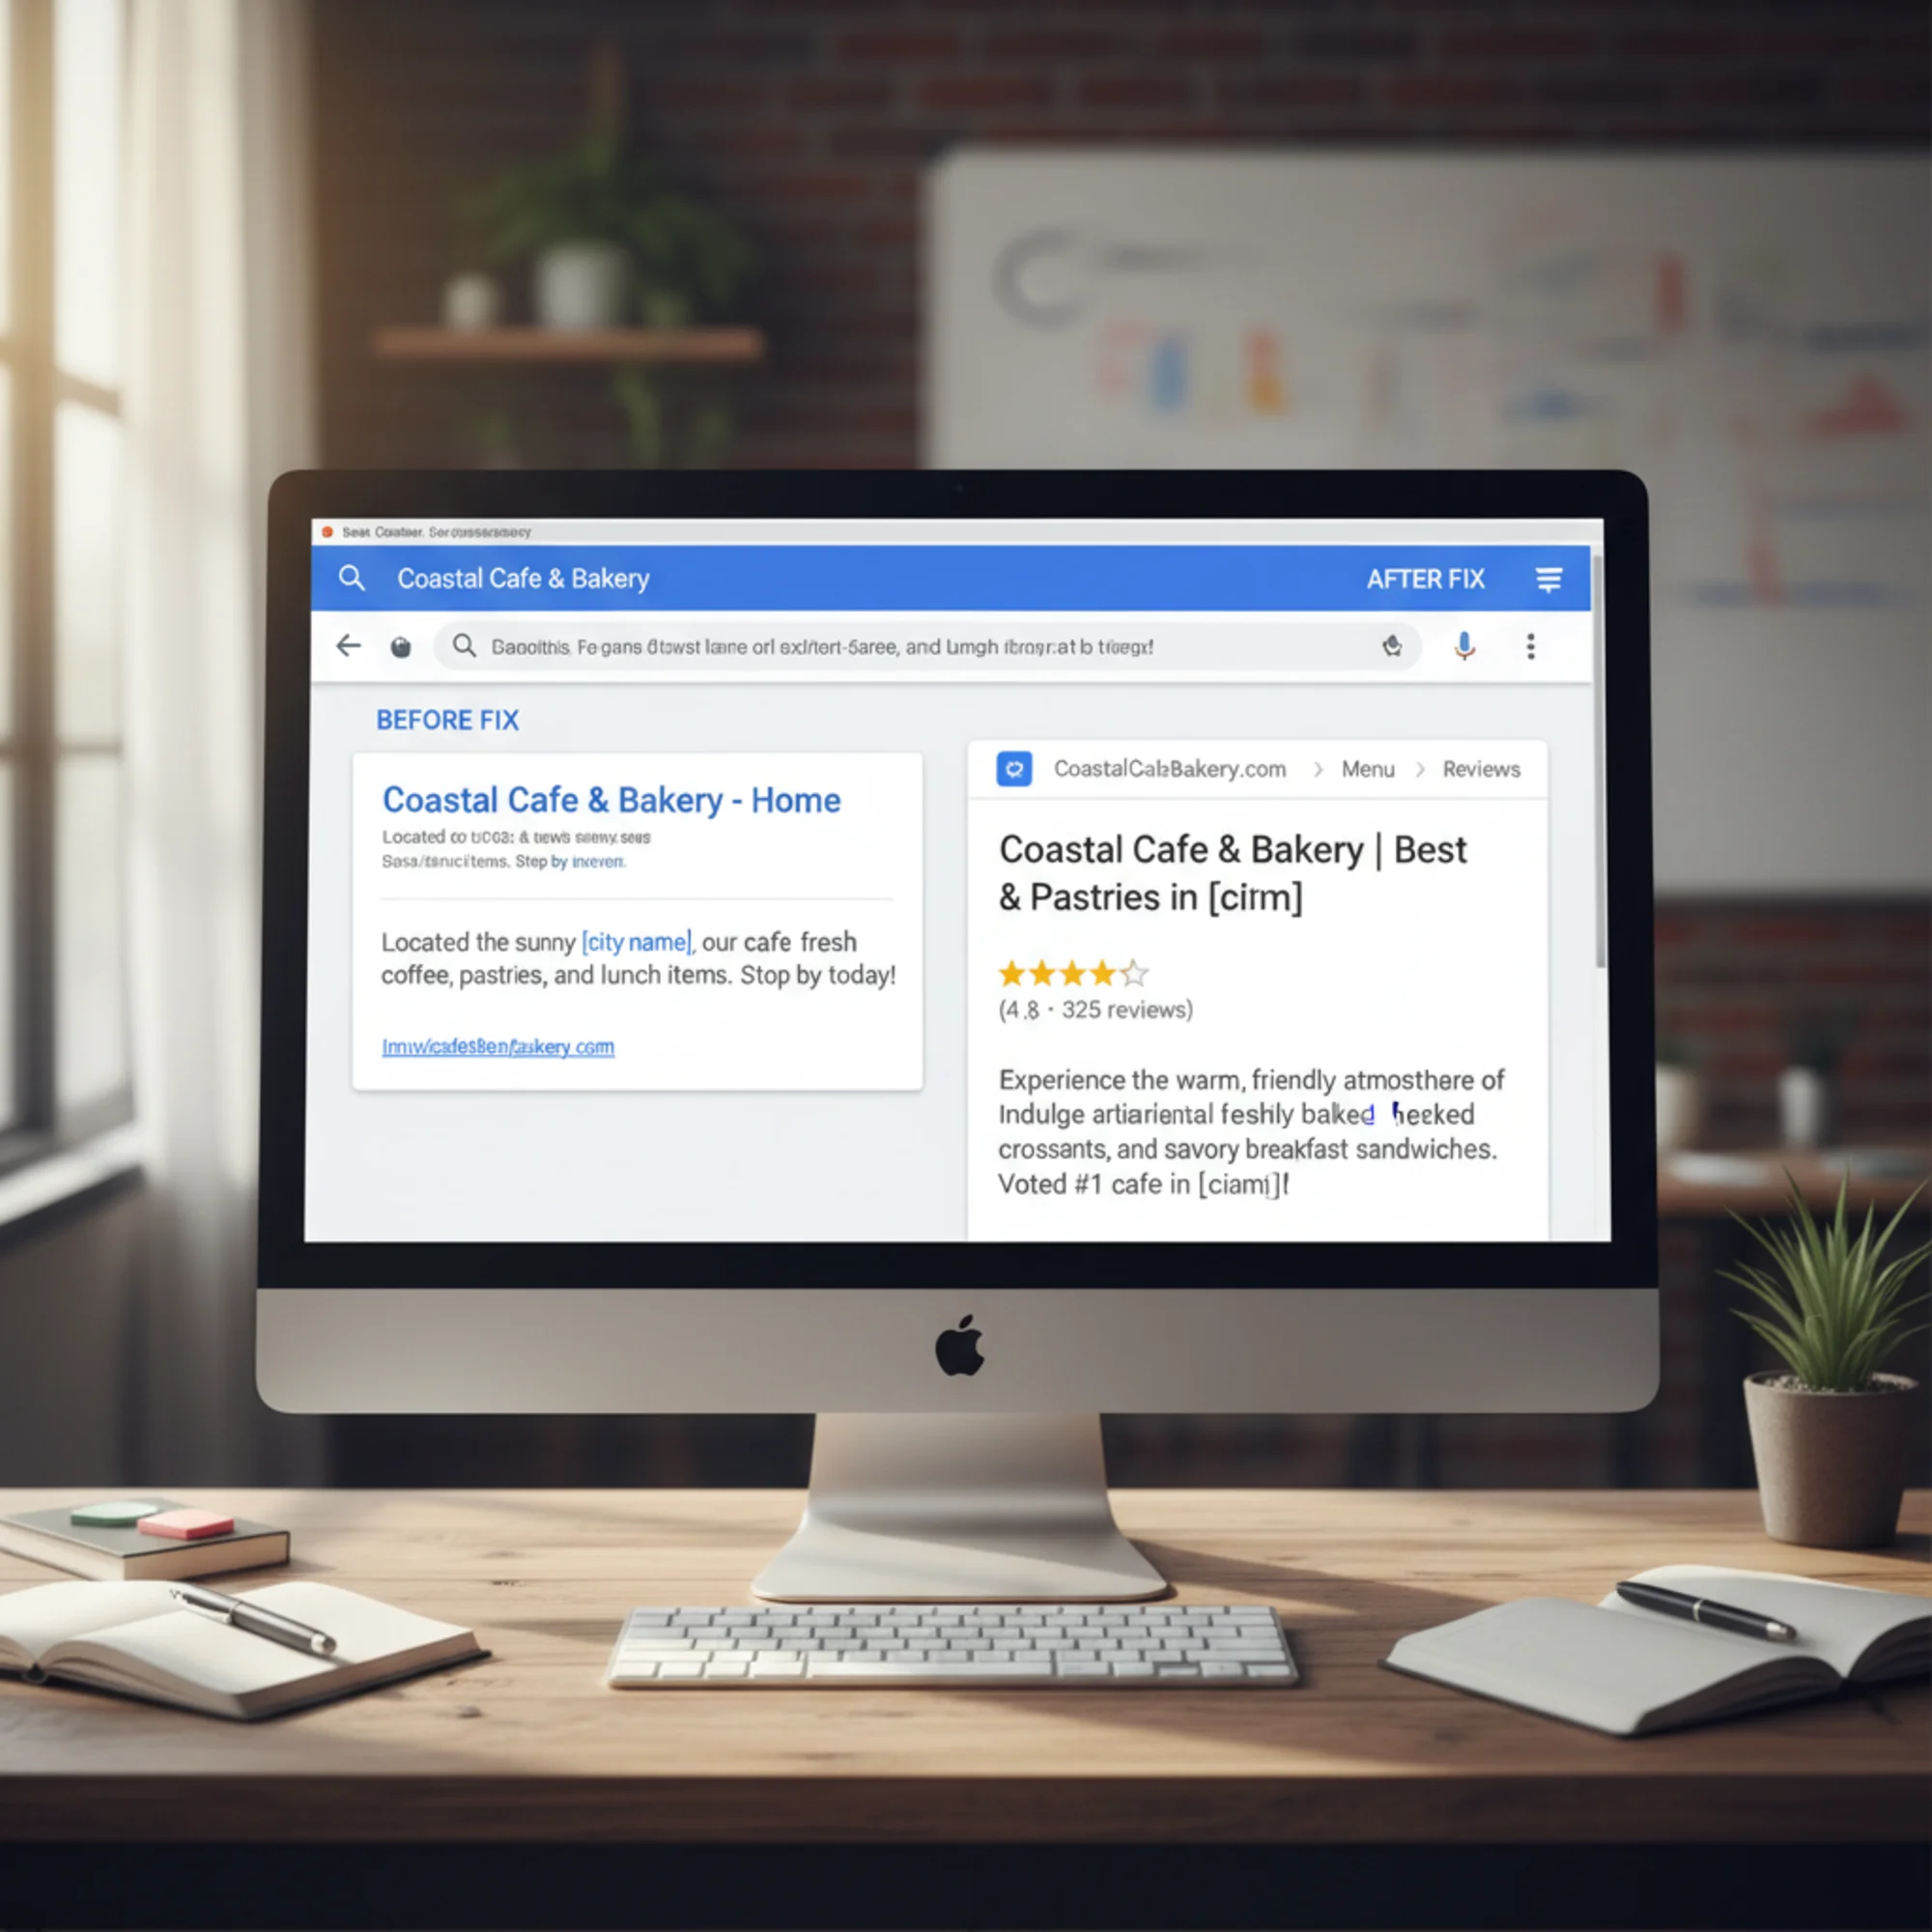
Fix 6: Add Basic Structured Data
What it is: Structured data (also called schema markup) labels your content so search engines understand it in a machine-readable way. It's what creates rich results in Google — star ratings, business hours, FAQ dropdowns, recipe cards, event listings, and more.
Why it matters: Pages with structured data can earn rich results that stand out visually in search listings. Rich results take up more space and draw the eye, increasing click-through rates significantly without changing your actual ranking position. A standard blue link might get a 3% click-through rate, while a rich result with star ratings and pricing information might get 8% or more — for the exact same position on the page.
How to fix it:
You don't need to write code for the most common types:
- WordPress: Install Rank Math or Schema Pro. They add structured data through a visual interface — select "Local Business," fill in your name, address, phone, and hours. Rank Math's free version handles the most common schema types. Yoast SEO also adds basic structured data automatically.
- Squarespace: Automatically adds basic structured data for business info and blog posts. You can enhance it through the Business Information panel in settings.
- Wix: Has a built-in SEO panel that supports structured data for common types. The Wix SEO Wiz walks you through the process.
- Shopify: Adds Product and Article schema by default. Many themes include additional schema for breadcrumbs and organization data.
Start with these three types (if they apply to your business):
- LocalBusiness — name, address, phone, hours, service area, price range. Essential for any business with a physical location or defined service area. This is the single most impactful schema type for local businesses because it feeds directly into Google's local search features.
- FAQ — if you have an FAQ page or FAQ sections on your service pages, marking them up can earn expandable answers directly in search results. Each question-answer pair shows as a dropdown under your listing, dramatically increasing your visual footprint in search results.
- Article — for blog posts and news content. Helps Google understand authorship, publication dates, and article structure. This is particularly useful if you publish regular content and want it to appear in Google's "Top Stories" or article carousels.
Other useful schema types to consider:
- Product — for e-commerce pages, enabling price and availability in search results
- Review/AggregateRating — to display star ratings (only use this with genuine customer reviews)
- Event — if you host events, workshops, or classes
- HowTo — for tutorial or instructional content
How to validate your markup: Paste any URL into Google's Rich Results Test (search for "Google Rich Results Test" — it's free and instant). It shows you exactly what structured data Google can see on your page and flags any errors or warnings. Run this test after adding any new schema to confirm it's working correctly.
Fix 7: Clean Up Your URL Structure
What it is: URLs should be short, readable, and descriptive. yoursite.com/services/roof-repair is far better than yoursite.com/?p=4827 or yoursite.com/services/our-amazing-professional-roof-repair-services-in-dallas-texas.
Why it matters: Clean URLs help users and search engines understand what a page is about before they even click. They're easier to share, more trustworthy in appearance, and more likely to be clicked when they show up in search results. URLs that look like random numbers or contain strings of query parameters don't communicate anything useful.
How to fix it:
- Set your permalink structure. In WordPress: Settings → Permalinks → choose "Post name." This is a one-time change that structures all future URLs as readable words instead of numeric IDs. If you're on Squarespace, Wix, or Shopify, the default URL structure is already clean — but you should still review individual page slugs.
- Fix existing pages. Review your most important pages and update slugs to be short and keyword-relevant. In WordPress, click "Edit" next to the URL slug when editing a page. Change
/our-complete-range-of-professional-plumbing-services-for-homeowners/to simply/plumbing-services/. - Always create a 301 redirect from the old URL to the new one when you change a slug — otherwise you'll create broken links and lose any ranking authority the old URL had built up.
URL best practices checklist:
- Use lowercase only (URLs are case-sensitive on most servers)
- Separate words with hyphens, not underscores or spaces
- Keep URLs under five words when possible
- Include your primary keyword naturally
- Avoid dates in URLs unless the content is genuinely time-sensitive (news, events)
- Don't stuff keywords — one occurrence of the target keyword is enough
- Remove stop words (a, the, and, of) when they're not needed for readability
- Use a consistent structure across your site (e.g.,
/services/plumbing/not a mix of/plumbing-services/and/services/plumbing/)
Warning: If your site has been live for a while and has existing rankings, changing URLs is a moderate-risk operation. Always set up 301 redirects for every URL you change. If you're changing dozens of URLs at once, do it in batches and monitor Search Console for crawl errors after each batch.
The 30-Minute Technical SEO Sprint
If you have half an hour, do these five things in order. Each one addresses a high-impact issue and can be completed quickly:
- Check Search Console for indexing errors (5 min) — Open the Pages report. Fix any "noindex" or "blocked" issues on important pages. This is the highest priority because blocked pages are completely invisible to Google.
- Write proper meta titles for your top 5 pages (10 min) — Homepage, main service pages, contact page. Make each title unique, under 60 characters, and include a relevant keyword. Add meta descriptions while you're there.
- Compress your largest images (5 min) — Open your media library, sort by file size, and download anything over 500 KB. Run those images through Squoosh or TinyPNG, then re-upload the compressed versions.
- Fix your top 3 broken links (5 min) — Check Search Console's "Not found (404)" report or run a quick crawl. Set up redirects for the most-linked broken URLs first.
- Submit your sitemap (5 min) — Go to Search Console → Sitemaps, paste your sitemap URL, and click Submit. If you already submitted it previously, check the status for any errors.
That half hour will produce a measurable difference — not a hypothetical one. You'll have fixed the issues that affect crawling, indexing, and click-through rate, which are the three areas where technical SEO has the most direct impact on traffic.
How to Keep Technical SEO on Track Going Forward
Fixing these issues once is great. Keeping them fixed is what separates sites that maintain their rankings from sites that slowly slide backward. Here's a simple maintenance routine:
Monthly (15 minutes):
- Check Google Search Console for new crawl errors or indexing issues
- Review any new 404 errors and set up redirects
- Compress images on any new pages or blog posts you've published
Quarterly (30 minutes):
- Run a full site audit to catch new issues
- Review your sitemap for pages that should be added or removed
- Test your Core Web Vitals — speeds can regress when you add new plugins or content
- Validate your structured data with Google's Rich Results Test
After any major site change:
- Platform migration, redesign, or URL restructure: run a full crawl comparison
- New plugin or theme: test page speed before and after
- Domain change: verify all redirects and resubmit your sitemap
See What's Actually Broken on Your Site
Reading about fixes is useful. Knowing which fixes your site needs is better.
Run a free audit with FreeSiteAudit and get a plain-English report of every technical SEO issue on your site — broken links, missing meta tags, slow pages, indexing problems, structured data gaps, and more. No sign-up required. Just enter your URL and see what needs fixing.
Most of what it finds, you can fix yourself using this guide. The audit prioritizes issues by impact so you know exactly where to start.
Sources
Check your website for free
Get an instant score and your top 3 critical issues in under 60 seconds.
Get Your Free Audit →